
Electrical work can be intimidating, but with the right knowledge and tools, you can tackle simple tasks like replacing a light switch or outlet cover. Whether you’re dealing with a faulty switch, upgrading to a dimmer, or simply want a new look, this guide will walk you through the process step-by-step. By following these instructions, you can complete the job safely and efficiently.
Understanding the Basics
Before diving into the replacement process, it’s essential to understand the basics of electrical work. Light switches and outlets are common fixtures in every home, and knowing how they work can help you make informed decisions. A light switch controls the flow of electricity to a light fixture, while an outlet provides a point of connection for electrical devices. Both components are crucial for the proper functioning of your home’s electrical system.
Tools and Materials You’ll Need
To replace a light switch or outlet cover, you’ll need the following tools and materials:
- Screwdriver (flathead and Phillips)
- Voltage tester
- Wire stripper
- Needle-nose pliers
- Electrical tape
- Replacement switch or outlet
- Outlet cover plate
Having these tools on hand will make the process smoother and safer.
Safety First: Preparing for the Task
Safety should always be your top priority when working with electricity. Follow these essential steps before beginning your project:
Turn Off the Power
The first and most critical step is to turn off the power to the switch or outlet you’ll be working on. Locate your home’s circuit breaker box and turn off the power to the specific circuit. Flip the switch on and off to confirm that the power is cut. Use tape to mark the breaker to prevent someone from accidentally turning it back on.
Use a Voltage Tester
Even after turning off the power, always use a voltage tester to ensure no current is flowing to the switch or outlet. Touch the probes to the terminal screws on the side of the light switch or outlet. If the tester shows no response, it’s safe to proceed.
Wear Safety Gear
While it might be tempting to skip safety gear, gloves and goggles can provide an extra layer of protection against unexpected sparks or debris. Choose rubber gloves for electrical insulation and eyewear that shields against small particles.
Replacing a Light Switch
Replacing a light switch is a common home improvement task that many homeowners can tackle themselves. Whether you’re dealing with a faulty switch, upgrading to a dimmer, or simply want a new look, this guide will walk you through the process.
Step-by-Step Process to Replace a Light Switch
- Remove the Switch Plate
- Use a screwdriver to remove the screws holding the switch plate in place. Set the plate and screws aside. Keeping track of small components helps simplify reassembly.
- Disconnect the Old Switch
- Unscrew the mounting screws holding the switch to the electrical box.
- Gently pull the switch out, being careful not to stress the wires.
- Take a photo of the wire connections for reference.
- Loosen the terminal screws and detach the wires one at a time.
- Connect the New Switch
- If necessary, strip about 3/4 inch of insulation from the wire’s ends using a wire stripper.
- Form a hook in each wire with needlenose pliers.
- Connect the wires to the new switch, matching the configuration of the old switch.
- Wrap the wire clockwise around each terminal screw and tighten securely.
- Connect the ground wire (usually green or bare copper) to the green screw on the switch.
- Secure the New Switch
- Carefully tuck the wires back into the electrical box.
- Push the switch into place and secure it with the mounting screws.
- Reattach the switch plate.
- Test the New Switch
- Turn the power back on at the circuit breaker.
- Test the switch to ensure it’s working correctly, turning the light on and off several times.
Replacing an Outlet Cover
Replacing an outlet cover is a straightforward task that can be done in a few simple steps. Whether you’re dealing with a damaged cover or simply want to update the look of your outlets, this guide will help you through the process.
Step-by-Step Process to Replace an Outlet Cover
- Turn Off the Power
- Go to the electrical panel in your house and flip the associated switch to turn off the power to the outlet. Double-check that the outlet is no longer live using a voltage tester.
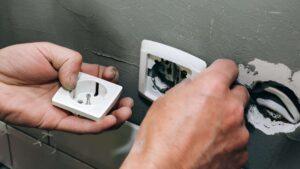
- Remove the Outlet Cover
- Use a screwdriver to loosen the screws and remove the cover (also known as the plate or faceplate) from the outlet. Set the plate and screw aside in a safe place.
- Install the New Cover
- Align the new cover plate with the outlet and secure it with the screws. Make sure the cover is properly aligned and tightened.
When to Call a Professional
While replacing a light switch or outlet cover is a manageable task for many homeowners, there are situations where it’s best to call a professional electrician. If you encounter any of the following issues, consider reaching out to a licensed electrician:
- Warm Switch Plate or Outlet
- Burning Smell
- Problems with Multiple Switches or Outlets
- Sparking, Popping, or Buzzing
- Frayed or Exposed Wiring
In such cases, it’s crucial to turn off the power and contact a professional to avoid potential hazards.
If you find yourself in need of expert assistance, don’t hesitate to reach out to RW Electrician Pensacola at 850-649-1500. Our experienced electricians can handle any electrical task, ensuring your home’s safety and functionality.
Conclusion
Replacing a light switch or outlet cover is a simple and rewarding DIY project. By following the steps outlined in this guide and prioritizing safety, you can successfully complete the task. Remember, if you ever feel unsure or encounter unexpected issues, it’s always best to call a professional. For any electrical needs, RW Electrician Pensacola is just a phone call away at 850-649-1500.
With the right tools, knowledge, and safety precautions, you can tackle these projects with confidence. Happy DIY-ing!
